How to Photograph Antiques for an Appraisal Photo Checklist: appraisal and value basics
How to Photograph Antiques for an Appraisal Photo Checklist research should start with identification, condition, provenance, and recent comparable sales. Use this guide to compare the signals that matter before paying for a formal appraisal or deciding whether to sell.
Every day, auction houses and appraisal services receive dozens of submission photos. Some contain the angles, marks, and condition details an expert needs to render a confident preliminary opinion. Many do not. A blurry shot of a vase taken against a busy wallpaper background, or a silver spoon photographed without its hallmark visible, forces the appraiser to guess — and guesses lead to wide valuation ranges or outright rejections.
As major auction houses including Heritage Auctions, Sotheby's, and Christie's have expanded their digital intake channels over the past two years, the quality of your photographs directly impacts whether your item gets accepted for consignment in the first place. This checklist distills what professional appraisers actually look for into eight specific shots you can capture with a smartphone.
Why Your Photos Determine the Accuracy of Any Appraisal
An online or photo-based appraisal works the same way an in-person one does: the expert examines the object's form, material, construction, marks, and condition. The only difference is that instead of turning the item over in their hands, they rely entirely on what your images show them.
Miss one angle — the reverse of a painting, the underside of a ceramic piece, a maker's stamp hidden on a bracket — and the appraiser is working with incomplete evidence. That incomplete evidence translates directly into valuation uncertainty. A piece that might carry a documented maker's premium could be valued at its generic-market equivalent simply because the identifying mark was never photographed.
The stakes are practical, not theoretical: a documented maker attribution can lift auction prices by 30% to several hundred percent. A "decorative brass bowl" with a visible Gorham sterling stamp becomes a catalogued Gorham piece. A "nice old vase" with a Tiffany Studios mark photographed clearly shifts from $200 to the thousands.
The 8-Shot Photo Checklist
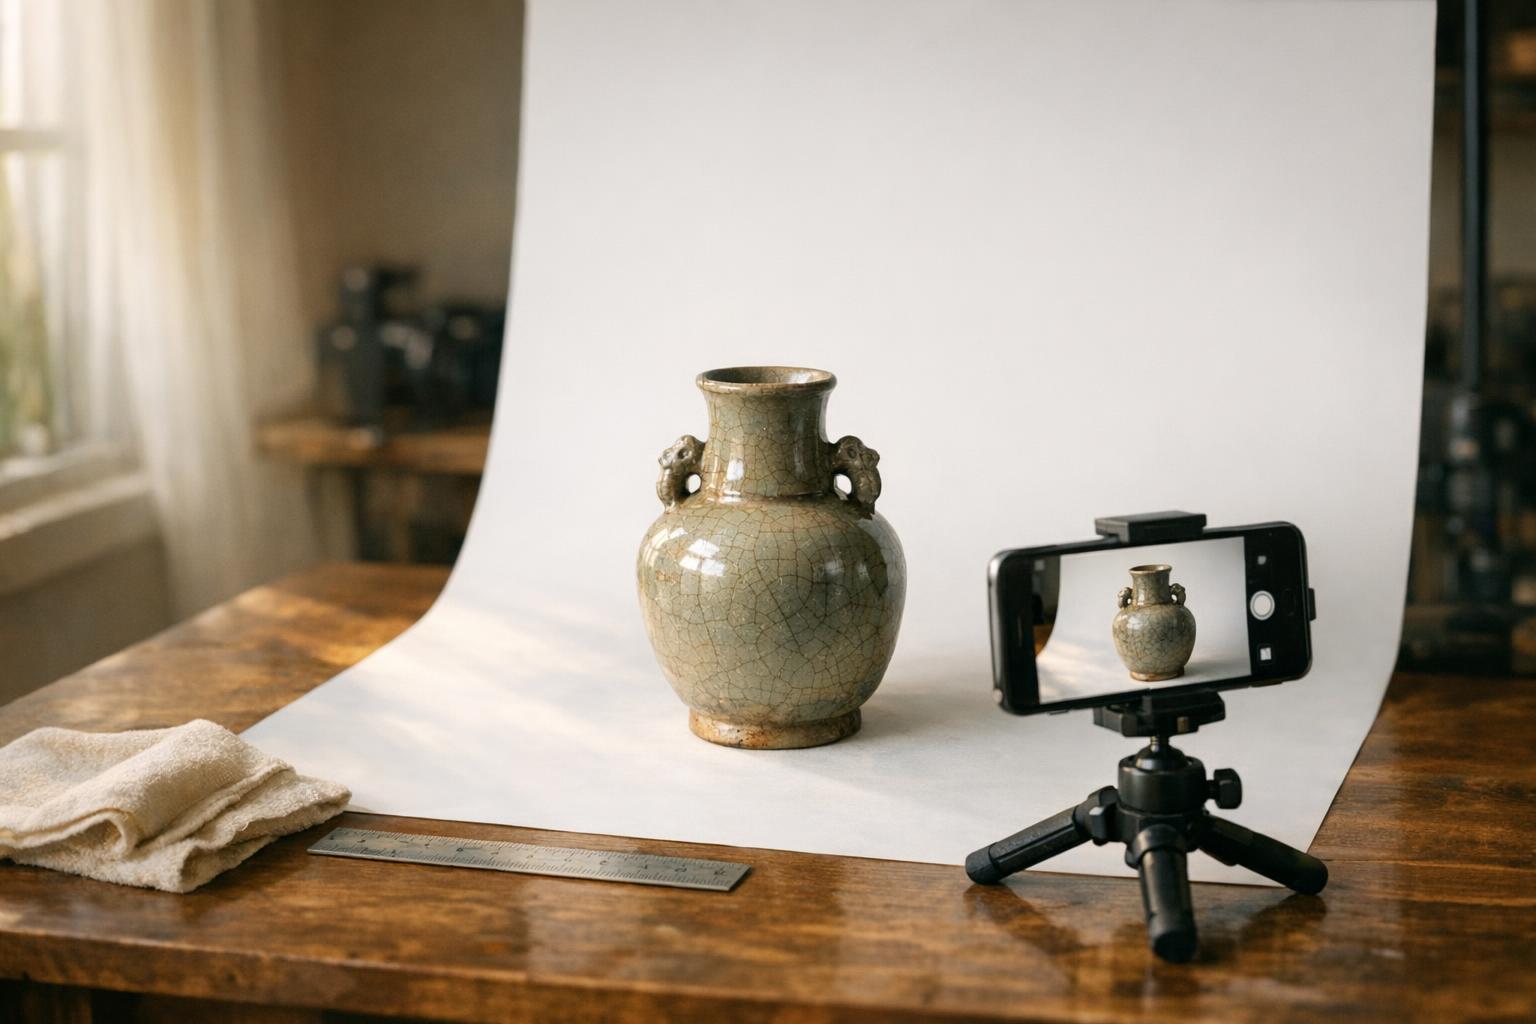
Photograph each of the following shots before you submit your item for appraisal. Think of this as the minimum viable documentation set — appraisers can work with eight clear photos more effectively than they can with twenty blurry ones.

Shot 1: Full Front View
Place the item on a clean, neutral surface — a white sheet, a plain tabletop, or a large piece of poster board work well. Center the item in the frame and shoot straight-on so the full form is visible. This is the establishing shot the appraiser uses to understand what the object is at a glance.
Leave breathing room around the edges. You want the item to dominate the frame without touching the borders, so the viewer can see the complete silhouette.
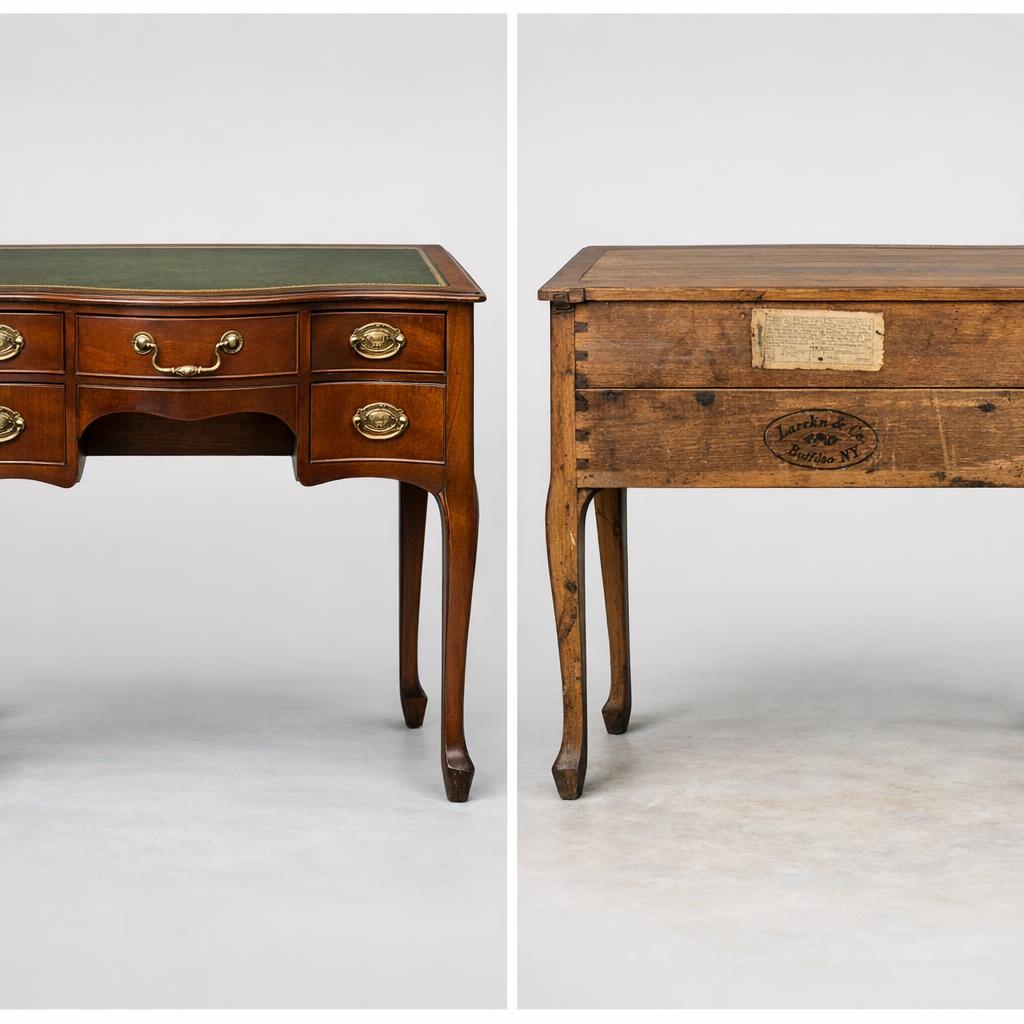
Shot 2: Full Back / Reverse View
Flip the item and photograph its underside, reverse, or back. This single shot reveals more authentication clues than any other: foundry stamps on bronzes, pottery marks on ceramics, manufacturer labels on furniture, mounting hardware that dates a piece to a specific era.
Heritage Auctions explicitly requires "the reverse of the object" in their appraisal photo guidelines — and they are not alone. Many maker marks, gallery labels, and inventory numbers live exclusively on the back.
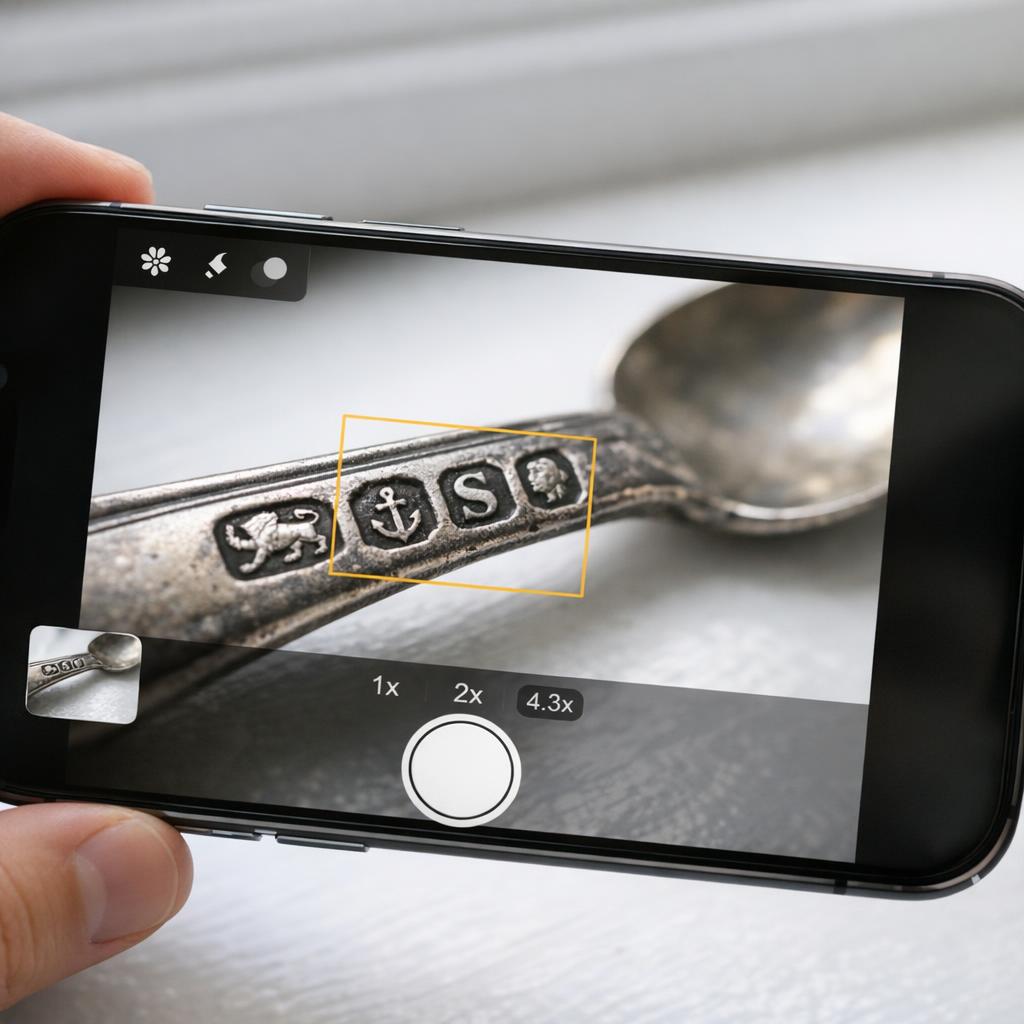
Shot 3: Maker's Marks & Hallmarks
This is the shot that most frequently determines whether an item gets its full market value. Get as close as your camera allows while maintaining sharp focus. Use your phone's macro mode or tap the screen to lock focus directly on the mark.
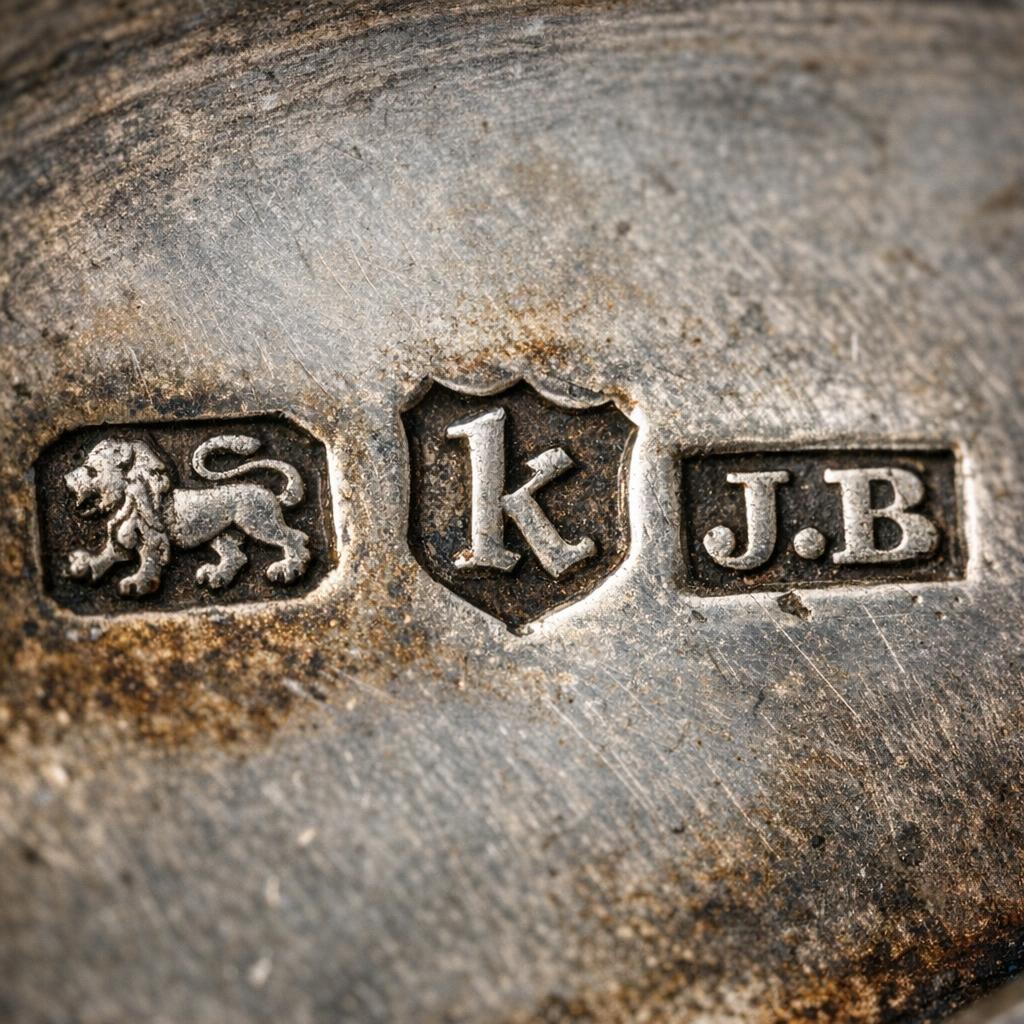
For silver items, look for lion passants, date letters, and town marks. For ceramics, check for impressed or painted factory marks. For bronze and metalwork, look for foundry stamps, edition numbers, or artist signatures. If you find any of these, photograph them as a separate dedicated shot — do not rely on them being visible in the wider views.
Shot 4: Signatures, Inscriptions & Labels
Signatures on paintings, engravings on metal, handwritten labels on furniture drawers, paper labels on the reverse of frames — these are provenance evidence. Photograph each one clearly, even if the text seems faded or hard to read. Modern phones can often capture detail the naked eye misses.
If the item has multiple marks or signatures, photograph each one individually rather than trying to fit them all into a single shot. An appraiser will zoom in on each, and a crowded image makes that impossible.
Shot 5: Condition Details
Every chip, crack, hairline fracture, repair, restoration, and area of wear matters for valuation. Appraisers price condition-adjusted values, not ideal ones — they need to see what is actually wrong with the piece, not just what is right.
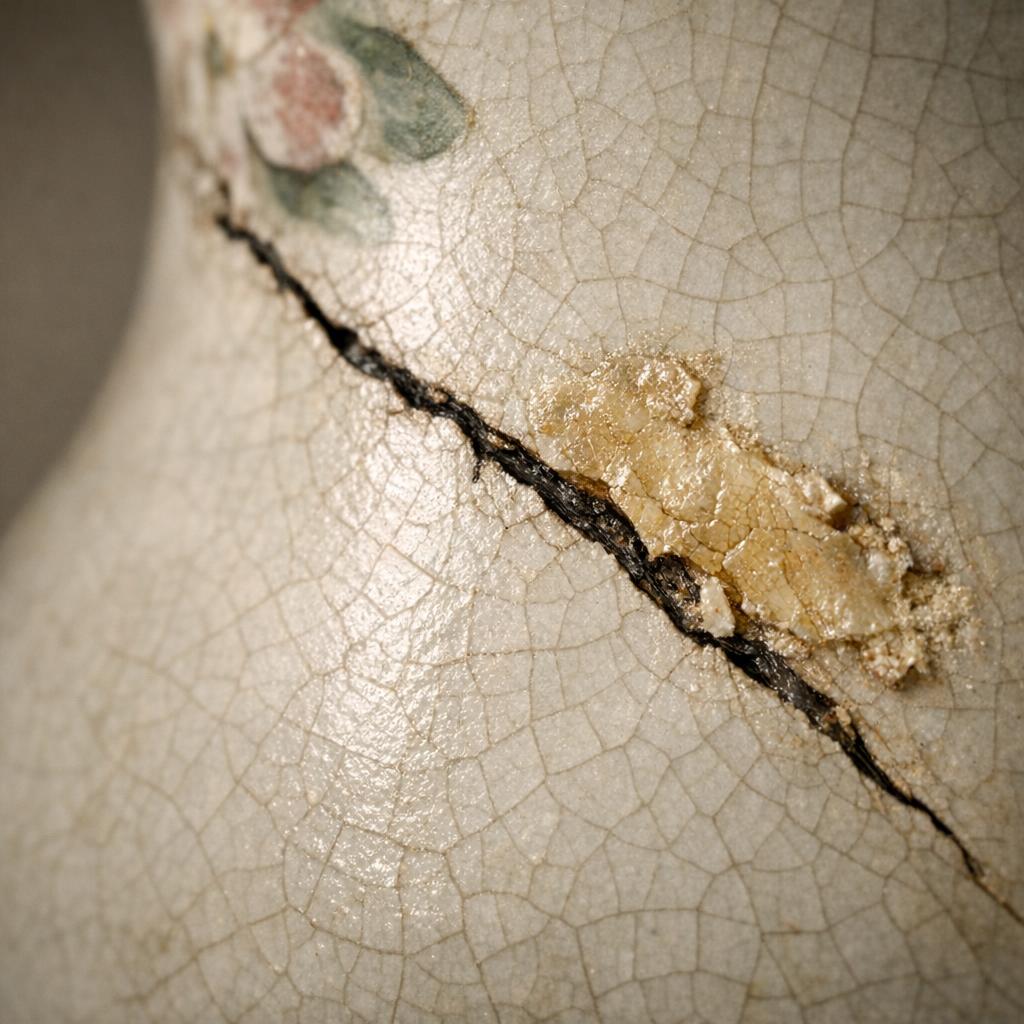
Use the raking light technique described below to make surface defects visible. A flat, evenly-lit photo can hide hairline cracks entirely. A chip that catches a raking shadow becomes impossible to miss — and the appraiser will price accordingly, which is exactly what you want.
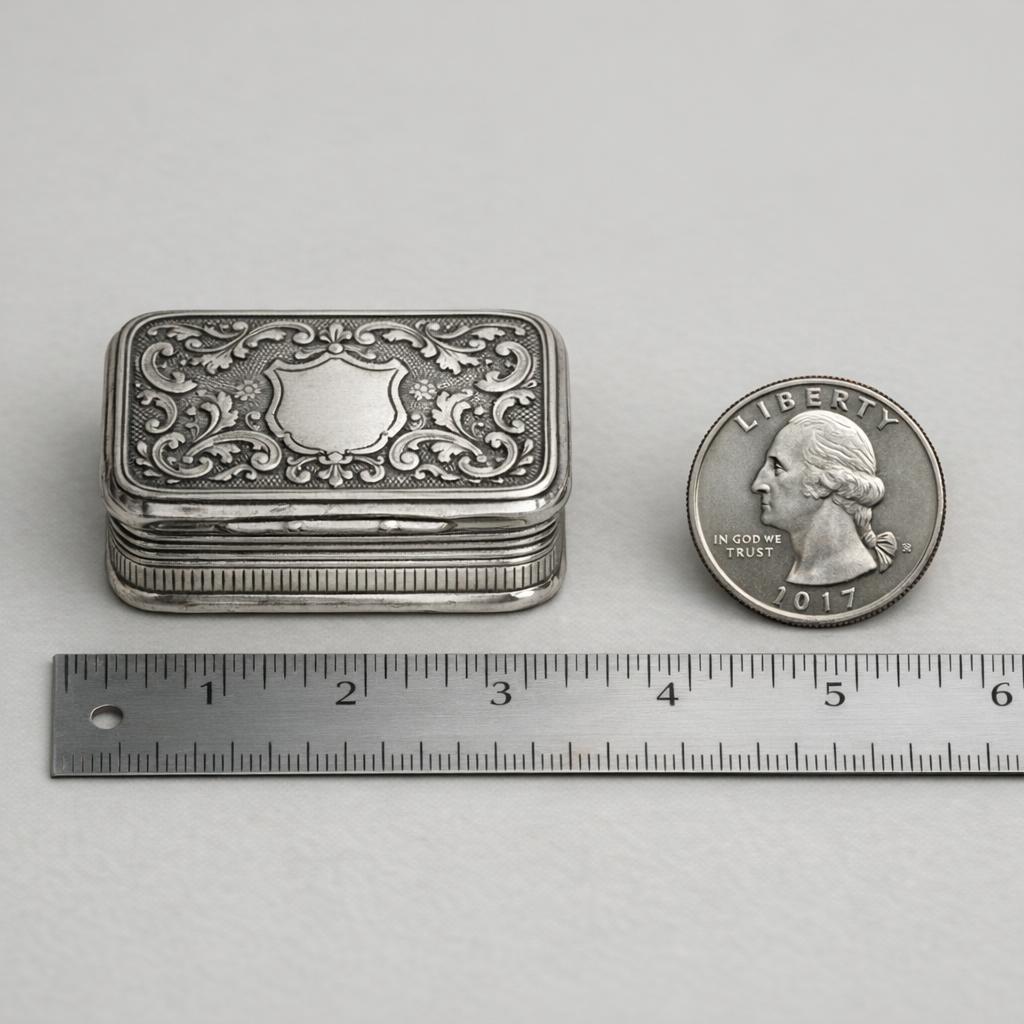
Shot 6: Scale Reference
Place a ruler, coin, or other familiar object next to the item and photograph them together. Without scale, an appraiser cannot tell whether your "small vase" is four inches tall or fourteen — and that difference affects shipping estimates, display context, and value range.
Shot 7: Side / Profile Angles
Rotate the item and photograph it from at least one side profile. Three-dimensional objects — sculptures, vessels, furniture — need to communicate their depth, curvature, and construction details. A profile shot reveals casting seams on metalwork, dovetail joints on furniture, thrown rings on pottery, and the depth of relief on decorative objects.
If the item has an irregular or asymmetrical shape, photograph multiple side angles. Each one adds to the appraiser's mental model of the piece.
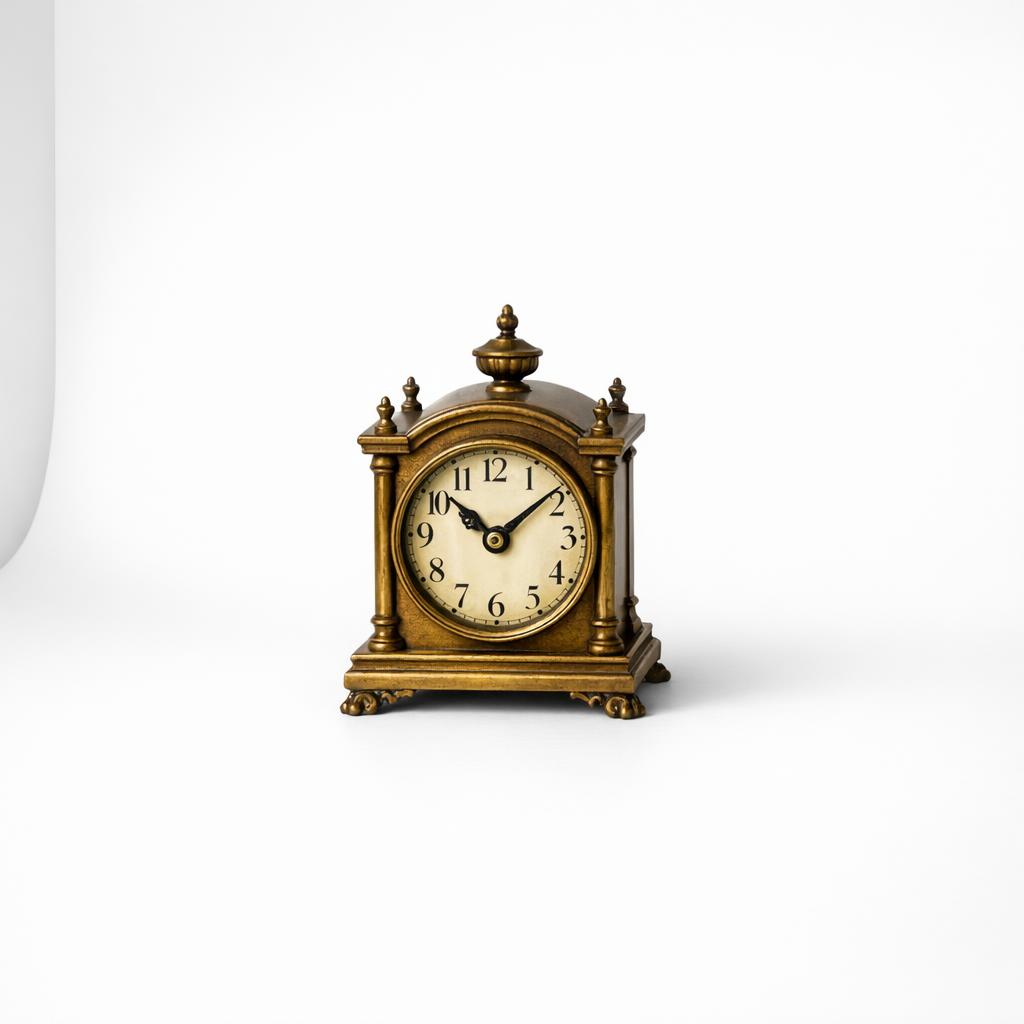
Shot 8: Interior & Detachable Parts
Open every lid, remove every detachable component, and photograph what is inside. Clock cases need interior movement shots. Jewelry boxes need compartment views. Lidded vessels — teapots, tureens, perfume bottles — need both the interior and the underside of the lid photographed separately.
Interior condition can differ dramatically from exterior condition. A pristine-looking box may have worn velvet, cracked mirrors, or broken dividers inside — all of which affect value. An appraiser needs to see both.
Lighting That Reveals the Truth
The single biggest factor in getting an accurate antique appraisal from a photo is lighting. Natural window light almost always outperforms camera flash, overhead LEDs, or ring lights for antique photography. Here is why:
Flash creates harsh reflections on glass, polished metal, and glazed ceramics — exactly the surfaces where you need maximum detail. Window light is diffuse and directional, which gives the appraiser's eye the gradient information needed to understand surface texture.
The Raking Light Technique
Raking light is the most underused technique in collector photography, and it is the most powerful single trick for revealing surface evidence. Position your light source — a window or a desk lamp — at roughly a 30-degree angle to the object's surface. The light skims across the surface rather than hitting it head-on.

This technique is essential for:
- Paintings: reveals craquelure patterns, impasto brushwork, and canvas texture that help date and authenticate.
- Metals: exposes chasing marks, casting seams, engraving depth, and the edges of stamps or hallmarks.
- Ceramics: makes hairline cracks, glaze crazing, and restoration areas visible that flat light completely masks.
- Wood and furniture: shows tool marks, planing patterns, and the depth of carved or inlaid details.
Shoot one photo with even, general lighting (the "what it looks like" shot) and one with raking light (the "what the surface actually is" shot). The combination gives the appraiser both the aesthetic and the forensic evidence.
Equipment You Already Own
You do not need a DSLR, macro lens, or lightbox to photograph antiques for appraisal. The camera in a modern smartphone is more than capable of capturing the detail an appraiser needs — if you use it correctly.
Smartphone Camera Tips
- Clean the lens first. A smudged phone lens is the number-one cause of blurry antique photos. Wipe it with a soft cloth before every session.
- Use macro mode for marks. Most phones have a dedicated macro or close-focus mode. Switch to it for hallmarks, signatures, and small stamps.
- Tap to focus. Tap the screen directly on the area you want sharp — the hallmark, the signature, the chip — so the phone exposes and focuses for that specific spot.
- Hold still or use support. Even slight movement during the exposure softens fine detail. Rest the phone against a cup, a book stack, or a small tripod.
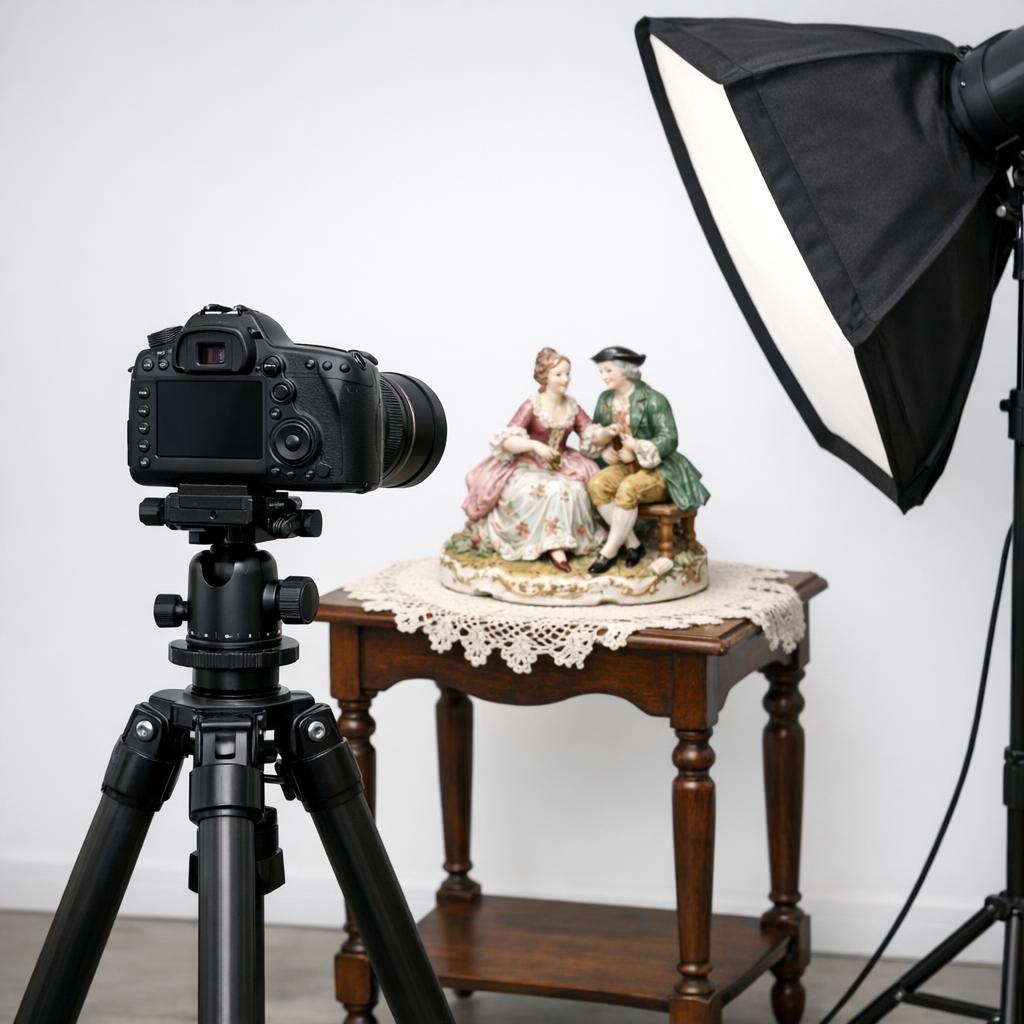
When a Dedicated Camera Helps
If you photograph items regularly for appraisal or resale purposes, a used entry-level DSLR with a 50mm or macro lens will give you more control over depth of field and focus stacking. But for a one-off submission or occasional documentation, your phone is sufficient. The technique matters more than the gear.
Background & Staging Setup
Your background does more than sit behind the item — it actively affects whether the appraiser can see the item clearly. A busy patterned tablecloth, a cluttered bookshelf behind the object, or strong color casts from a painted wall all compete with the object for attention.
The setup rules are simple:
- Neutral and uniform: white, light grey, or black. No patterns, no logos, no visible textures that could be mistaken for part of the item.
- Large enough: the backdrop should extend behind and beneath the item so no edge of your table or floor appears in the frame.
- Non-reflective: glossy surfaces create unwanted highlights. Matte poster board or a cotton sheet works better than a glass table or polished surface.
If you document multiple items in one session, keep the backdrop and lighting setup consistent so the appraiser sees a coherent batch. Consistency signals care and makes it easier to compare items side by side.
What Appraisers Actually Need From Your Photos
Understanding what the appraiser does with your photos helps you take better ones. Here is the practical reality:
- File size and format: JPEG or HEIC files from your phone are fine. Aim for files between 1 MB and 5 MB each — large enough to hold detail, small enough to upload quickly. Do not heavily compress or apply beauty filters.
- Quantity: eight photos per item is the sweet spot. Fewer than four and the appraiser is guessing. More than fifteen and the signal-to-noise ratio drops unless each additional shot adds genuinely new information.
- What a preliminary opinion requires: with clear photos of all eight checklist angles, an experienced appraiser can typically provide a preliminary value range, identify whether further expert examination is warranted, and advise on the best route (insurance appraisal, auction consignment, private sale, or further research).
- What photos cannot do: photos alone cannot confirm authenticity in every case. Some items require hands-on examination, scientific testing, or provenance research. Good photos help the appraiser decide whether deeper investigation is worthwhile — and they ensure the first opinion is as accurate as possible.
When Heritage Auctions states in their appraisal guidelines that "clear, close-up photographs of the overall object, the reverse of the object, and the signatures, inscriptions, and/or marks are invaluable," they are describing essentially the same checklist above. The difference is that most collectors never read the guidelines — or if they do, they send three photos instead of eight.
When Photos Aren't Enough
Even with eight well-lit, sharply focused photos, some items resist clear identification from photography alone. Items that commonly need hands-on examination include:
- Paintings with disputed attributions: brushwork analysis under magnification, pigment identification, and canvas weave examination often require in-person inspection.
- High-value jewelry with hidden marks: hallmarks inside ring bands, under gemstone settings, or on clasp mechanisms may not photograph clearly at all.
- Items with sophisticated forgeries: when a reproduction is intentionally aged and marked to deceive, even expert photographers need laboratory analysis.
- Organic materials: ivory age determination, wood species identification, and textile fiber analysis benefit from physical sampling.
If you have followed this checklist and the identification still feels uncertain, that is the right moment to share your photos with a specialist who can guide you on next steps. A documented expert review can save months of independent research and prevent costly misidentifications.
Start your appraisal and share your photos with a specialist who can review your documentation and advise on the best path forward.
Two-step intake
Share your antique photos with an expert today
Share the basics and we’ll route you to the right specialist with a written quote and next steps.
Secure intake. Routed to the right specialist. Checkout only if you decide to proceed.
Need an appraisal-ready photo set reviewed?
Upload clear overall shots, marks, scale, damage, backs, undersides, labels, and any receipts or provenance notes.
- Written value range with market context
- Authentication guidance and next steps
- Secure intake synced to CRM
No obligation. If we cannot help, we will point you in the right direction.
Find a specialist for your item
Our network covers furniture, ceramics, silver, paintings, jewelry, and collectibles. Tell us what you have and we will match you to the right expert.
References & Sources
- Heritage Auctions, Appraisal Photo Requirements — ha.com/information/appraise_photo.s
- Appraisily Editorial Policy — appraisily.com/editorial-policy/
- Ronati, Photography Tips for Antiques Dealers — ronati.com
Search variations collectors ask
Readers often Google these phrases when documenting items for appraisal:
- how to take photos of antiques for appraisal — covered in the 8-shot checklist above
- what angles to photograph antique jewelry for valuation — see Shot 3 (hallmarks) and Shot 7 (profile)
- best lighting for photographing silver hallmarks — natural window light with raking technique, Shot 3
- how to photograph pottery marks and maker stamps — macro mode + raking light, Shots 3 and 5
- photo checklist for antique furniture appraisal — all 8 shots apply, with emphasis on Shots 2, 4, and 8
- how many photos do I need for an online appraisal — eight is the sweet spot, discussed in "What Appraisers Need"
- can I use my phone to photograph antiques — yes, see the "Equipment You Already Own" section
- how to show condition damage in antique photos — Shot 5 with raking light reveals hidden defects
- what background to use for antique photography — neutral, uniform, non-reflective (white, grey, or black)
Each question is answered in the guidance above. If your item raises additional questions, share your photos and we will advise.